GOOMWAVE FLASHING GUIDE:
Step 0: Get a J-Link Edu Mini Debugger, available from:
https://www.adafruit.com/product/3571
Step 1: Install Microchip Studio, available from:
https://www.microchip.com/en-us/development-tools-tools-and-software/microchip-studio-for-avr-and-sam-devices#Downloads
Step 2: Physically Construct J-Link by connecting the included 10-pin cable to the header on the chip. The cable must be connected so that the red wire is on the right side of the board with the chip facing up and the cable leaving the top short side of the board as shown (VERY IMPORTANT).
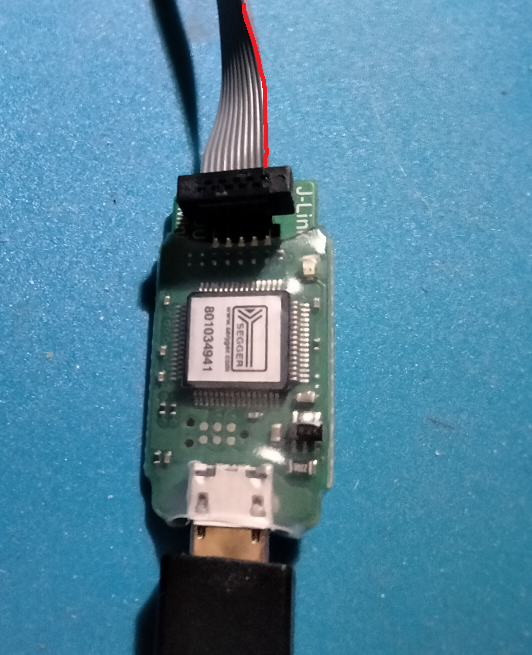
If you connect the cable backwards, the process will fail with a variety of errors. Ensure the cable is facing outward and upward with the red wire on the right side of the cable.
Step 3: Connect the J-Link to the connector on the goomwave motherboard and plug it into your PC.
Step 4: Plug the goomwave motherboard into a gcc adapter. This process will not work at all without voltage from a cable, so flashing boards without their cables is not yet possible. If you get errors related to connecting to a device via SWD, this is likely why.
Step 5: In Microchip Studio, go to Tools and open Device Programming, or press CTRL+SHIFT+P to pull the window up.
Step 6: Under the Tool dropdown, select your J-Link device. This menu might say a few different things, it may say J-Link xxxxxx or USB device xxxxxx. There should only be one device available. If there are more, unplug errant USB devices from your system, or select J-Link directly.
Step 7: Under Device, select the device “ATSAMD51G19A”
Step 8: Under Interface, select SWD, then hit Apply.
Step 9: Click “Fuses” under the left side menu. A message may pop up mentioning chip security and that you will have to clear the chip in order to continue. If you see this, hit yes and your board will be unlocked and wiped. If you do not see any pop up notice, the fuses section should populate with values. You shouldn’t need to change any settings here, but scroll down the fuses list to verify that USER_WORD_1.NVMCTRL_SEESBLK and USER_WORD_1.NVMCTRL_SEEPSZ are both set to 0x01.
Step 10: Click “Memories” under the left side menu. Open your goomwave firmware file and click “Program”. There should be a pop-up progress bar that shows you the erase + flash process. If that completes succcessfully, move onto the next step. If it errors out, verify that everything is connected properly and try again. You can download firmware from: https://www.riennecustoms.com/goomwave-firmware-download-links/
Step 11: Go back to Fuses and hit Program near the bottom.
Step 12: You’re done! Unplug the goomwave from power and the flasher and it’ll be ready to go.